 Pin
Pin I still remember the Sunday morning when my sister called, voice bright with excitement, asking if I could create something special for her book club brunch. She wanted a show-stopper, something that would make her guests feel celebrated without being fussy. I started thinking about all those elaborate charcuterie boards I'd been seeing, but realized what people really craved was warmth—the comfort of pancakes and scones, arranged with the care of a still-life painting. That afternoon, I created my first brunch board, and watching my sister's guests gather around it, lingering over conversation and maple syrup, I knew I'd discovered something magic.
I'll never forget the way my neighbor's eight-year-old daughter's eyes lit up when she saw the board, arranged in those spiraling waves. She whispered to her mother, 'It's too pretty to eat,' but of course she did, stacking three mini pancakes high with a little scone on the side. That moment taught me that sharing food on a board like this isn't just about feeding people—it's about creating a memory where everyone feels noticed.
What's for Dinner Tonight? 🤔
Stop stressing. Get 10 fast recipes that actually work on busy nights.
Free. No spam. Just easy meals.
Ingredients
- All-purpose flour (4 cups total): The foundation of both pancakes and scones; it needs to be measured correctly (spoon and level, not scooped) to avoid dense results. Flour is forgiving when you treat it gently.
- Granulated sugar (6 tablespoons total): Just enough sweetness without overwhelming the other flavors—sugar also helps create tenderness in both batters.
- Baking powder and baking soda: These are your fluffy secret; they create those beautiful bubbles that make pancakes pillowy and scones light. Freshness matters here—if your baking powder has been open for over six months, replace it.
- Fine sea salt: A small amount that brings all flavors into focus without tasting salty; it's the invisible magic that makes everything taste more like itself.
- Room temperature eggs (3 total): Cold eggs won't emulsify properly with the wet ingredients, so let them sit on the counter for 15 minutes before using.
- Buttermilk (2/3 cup plus 1 cup): The tanginess creates tender crumbs and enhances browning; if you don't have it, whisk regular milk with a tablespoon of lemon juice and let it sit for five minutes.
- Cold unsalted butter (6 tablespoons for scones, 1/4 cup melted for pancakes): Cold butter in scones creates those coveted flaky layers; melted butter in pancakes creates richness. The difference is intentional and matters tremendously.
- Pure vanilla extract: A teaspoon in each batter deepens flavor in a way you can't quite identify—people just say 'this tastes really good.'
- Heavy cream (2/3 cup): Creates incredibly tender scones; don't substitute with milk or lighter cream.
- Fresh fruit (5 cups assorted): Choose ripe but still-firm fruit for the best color and texture; slightly underripe fruit holds up better on the board.
- Pure maple syrup (1/2 cup): Warm it gently before serving for that luxurious feeling; real maple syrup matters here—it's the star of the show.
Instructions
- Whisk your dry pancake ingredients with intention:
- In a large bowl, combine your flour, sugar, baking powder, baking soda, and salt. Whisk slowly and deliberately for about thirty seconds—this distributes the leavening agents evenly so every mini pancake rises with equal enthusiasm. You're not mixing in air; you're creating an even foundation.
- Combine wet ingredients in their own bowl:
- Whisk your eggs until they're uniform and pale, then add buttermilk, melted butter, and vanilla. Whisk until completely smooth and homogeneous. This step takes only two minutes but ensures even cooking.
- Bring wet and dry together with a gentle hand:
- Pour the wet mixture into the dry ingredients and fold with a spatula, using broad, slow movements. Stop as soon as you don't see dry flour anymore—those small lumps are your friends. Overmixing here is your enemy; it develops gluten and creates tough pancakes. The batter should look thick but pourable, with visible small lumps. Let it rest for ten minutes while your skillet preheats; this allows everything to hydrate gently.
- Heat your cooking surface to medium:
- A nonstick skillet or griddle at medium heat (about 350°F if you have a thermometer) is your sweet spot. Let it preheat for two minutes, then lightly grease it with oil or melted butter, wiping away excess with a paper towel. The surface should look barely shiny.
- Drop, watch, and wait:
- Using a tablespoon or small cookie scoop, drop batter portions onto the hot surface, spacing them an inch apart. For the first minute to ninety seconds, do nothing but watch. You'll see bubbles form across the surface—these are the sign you're waiting for. When the bubbles break and the edges look dry and set, and the bottoms are golden brown (peek with a thin spatula if you're curious), it's flip time.
- Flip with confidence:
- Use a thin, flexible spatula and flip each pancake with one smooth motion. Cook the second side for another minute to ninety seconds until it's golden and springs back gently to the touch. Transfer to a wire rack immediately—stacking while hot creates steam, which makes them soggy, and nobody wants that.
- Repeat until your batter is gone:
- Keep cooking in batches, regreasing between them. You'll produce 32 to 36 adorable mini pancakes. If they start sticking more as you go, your skillet might have gotten hotter; turn the heat down slightly.
- Prepare your scone dry mix:
- Preheat your oven to 400°F and line a baking sheet with parchment paper. In a large bowl, whisk together flour, sugar, baking powder, and salt. This is your scone foundation.
- Cut in cold butter like you're making snowflakes:
- Add your cold, cubed butter to the flour mixture. Using a pastry blender, two knives, or your fingertips, break the butter into the flour using quick motions. Work fast—your hands are warm, and you want to keep the butter cold. You're aiming for a texture like coarse sand with some pea-sized pieces still visible. These small cold butter pockets will create steam during baking and give you those tender, flaky layers.
- Add your mix-ins if using them:
- If you're adding chocolate chips, blueberries, or dried cranberries, toss them into the flour mixture now so they distribute evenly.
- Combine wet ingredients for scones:
- In a small bowl, whisk together heavy cream, beaten egg, and vanilla extract until completely smooth.
- Bring the dough together gently:
- Pour the wet mixture over the dry ingredients and stir with a fork using quick, light motions. Stop as soon as you don't see dry flour anymore—the dough will look a bit shaggy and that's perfect. Do not overmix; scones reward a light touch.
- Pat, cut, and arrange:
- Turn the dough onto a lightly floured surface and gently pat it into a 3/4-inch thick rectangle. Using a small knife or round cutter, cut it into one-inch squares or rounds. Arrange them an inch apart on your parchment-lined baking sheet. Brush the tops lightly with additional cream for a gorgeous golden finish.
- Bake until set but still moist:
- Bake for nine to twelve minutes—watch for golden tops and a slightly firm exterior. The interior should still feel tender; if you overbake, they'll dry out. Transfer to a cooling rack immediately.
- Prepare your fruit with care:
- Wash everything under cold running water and pat dry. Slice strawberries, halve grapes, cut pineapple into bite-sized wedges, and slice kiwis. Inspect each piece for bruises or soft spots; you're using only ripe, fresh, beautiful fruit. Pat berries dry with a paper towel so they don't get sticky on the board.
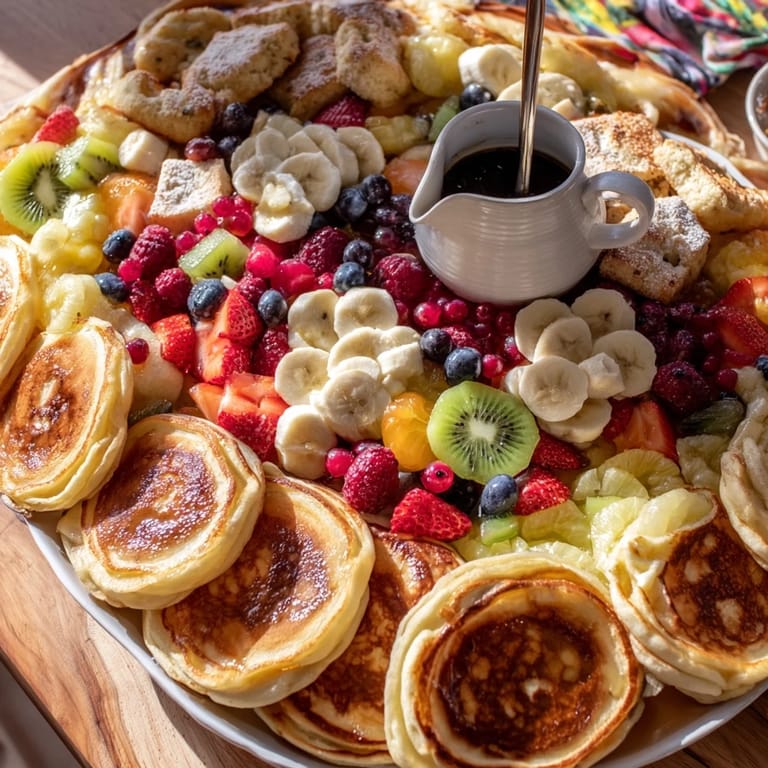
- Select your canvas:
- Choose a large, food-safe wooden board or platter at least eighteen inches across. This is your stage.
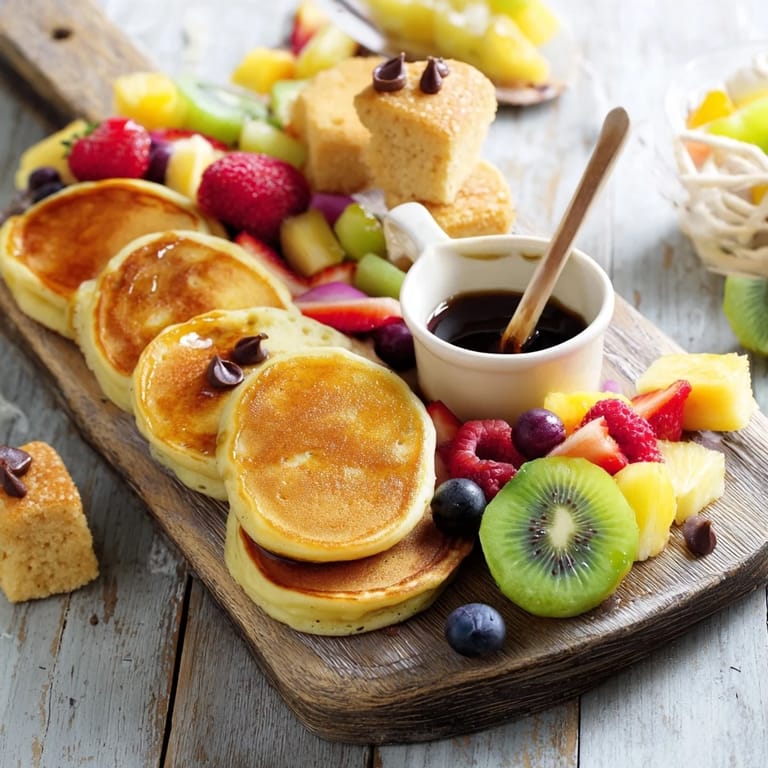
- Place your syrup centerpiece:
- Put a small pitcher or ramekin of warm maple syrup right in the center or slightly off-center. This anchors the entire composition and makes it easy for guests to drizzle as they serve themselves.
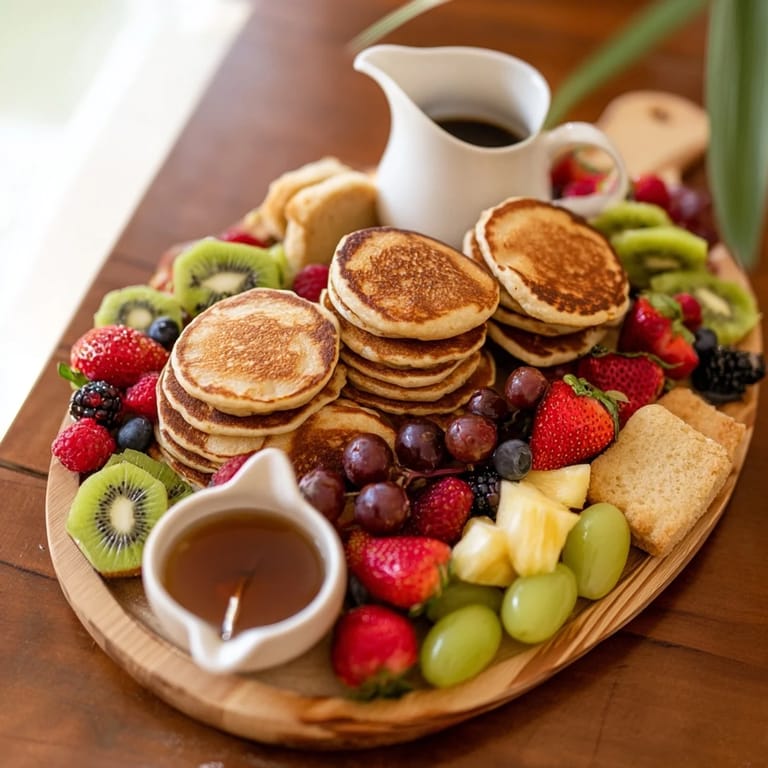
- Create flowing arrangements:
- Arrange mini pancakes in loose, stacked curves radiating from the syrup like gentle waves. Nestle the tiny scones along a separate path. Fill the gaps with mounds of fresh fruit, alternating colors and shapes—strawberries next to blueberries, pineapple next to kiwi. Think about color contrast and visual balance.
- Add finishing touches:
- Place small bowls of softened butter, honey, or clotted cream around the board if desired. These little additions give guests options and make the board feel generous.
- Step back and admire:
- The board should look abundant, inviting, and easy to graze. Nothing should be stacked so tightly that people struggle to access it. Adjust any items so the arrangement flows naturally and nothing looks crowded.
 Pin
Pin 
There was a moment during a spring brunch when my mother-in-law, who had always been critical of my cooking, sat quietly looking at the board I'd arranged. She picked up a scone, broke it open, steam rising from the buttery interior, and took a small bite with her eyes closed. When she opened them, she smiled at me in a way she never had before. It reminded me that food prepared with care and arranged with intention speaks a language deeper than taste—it says, 'You matter to me, and I wanted this moment to be special.'
Timing Your Brunch Board Perfectly
The beauty of this brunch board is that you can prepare most of it ahead of time. Pancakes and scones can be made up to two hours before serving and kept at room temperature, covered loosely. Slice and prepare all your fruit the morning of but keep it in the refrigerator until thirty minutes before guests arrive—this keeps everything crisp and fresh. Warm your maple syrup just before assembling so it's still warm when people gather around. The key is removing the pressure of last-minute cooking; everything should be calm and ready, so you can actually enjoy being with your guests instead of stressing in the kitchen.
Making This Board Your Own
The foundation—pancakes, scones, syrup, and fruit—is solid, but your personal touches make it special. If you love chocolate, add mini chocolate chips to the scone batter or drizzle some melted chocolate over the finished pancakes. If certain fruits are at their peak in your season, use those instead of what I've listed. In summer, add fresh peaches and berries; in fall, add apple slices and dried cranberries. Swap vanilla for almond extract if that calls to you, or add cardamom to the scone dough for warmth. This is your canvas, and the recipe is just the beginning.
Storage and Leftovers Done Right
Leftover pancakes and scones are a gift to your future self. Cool them completely, then store them in airtight containers at room temperature for up to one day, or in the refrigerator for up to three days. To reheat pancakes, lay them in a dry skillet over low heat or pop them in the toaster; they'll regain their softness. Scones can be warmed in a 300°F oven for five minutes, which revives their tender crumb beautifully. Fruit, once sliced, should be consumed within a few hours or stored separately in the refrigerator. Never leave dairy-based items like butter or cream at room temperature for more than two hours—discard anything that looks questionable. A little caution here keeps everyone safe and happy.
- Make the pancake and scone batters the night before and refrigerate them; they'll be ready to cook first thing in the morning.
- Use parchment paper under your scones so they don't stick, and line your pancake cooling rack with it to prevent sticking there too.
- A large wooden board looks more beautiful than plastic, but make sure whatever you use is food-safe and has been properly cleaned.
 Pin
Pin Creating a brunch board is an act of love, whether you're feeding your family on a quiet Sunday or hosting friends for a special occasion. It's about slowing down, savoring time together, and saying through food that people matter.
Recipe Questions & Answers
- → How do I keep mini pancakes tender and fluffy?
Mix the batter gently and avoid overmixing to maintain a light texture. Letting the batter rest for 10 minutes helps activate the leaveners, resulting in fluffier pancakes.
- → What’s the best way to achieve flaky tiny scones?
Use cold butter cut into the flour quickly to create pea-sized crumbs. Handle the dough minimally and keep ingredients chilled for a tender, flaky crumb.
- → Can the fruit selection be adapted seasonally?
Absolutely! Use in-season fruits like peaches, figs, or berries depending on availability to keep the board fresh and vibrant.
- → How should leftover pancakes and scones be stored?
Cool completely, then store in airtight containers at room temperature for up to a day or refrigerate for up to three days. Reheat pancakes on a dry skillet and scones gently in a low oven.
- → What are some serving suggestions for the board?
Arrange items on a large platter with a small pitcher of warm maple syrup in the center. Add bowls with butter, honey, or clotted cream to enhance flavors and textures.