 Pin
Pin I remember the first time I created a full spread of pickled and fermented vegetables—it was for a late summer dinner party when a friend challenged me to bring something colorful and different. I'd been curious about fermentation for ages, always intimidated by the science of it all, but that afternoon in the kitchen, surrounded by jars and vinegar and the smell of fresh dill, something clicked. Watching those vegetables transform over days felt like magic, and when I finally arranged them on a board with the late afternoon sun hitting the jars just right, I realized I'd stumbled onto something that was both deeply satisfying to make and absolutely stunning to share.
There's a particular moment I chase now when making this platter—it's when I'm arranging the jars on a board and someone walks into the kitchen and just stops. The colors are so vivid against the glass, the arrangement so intentional, that it barely feels like food at first. That's when I know I've got it right, and everyone else will too.
What's for Dinner Tonight? 🤔
Stop stressing. Get 10 fast recipes that actually work on busy nights.
Free. No spam. Just easy meals.
Ingredients
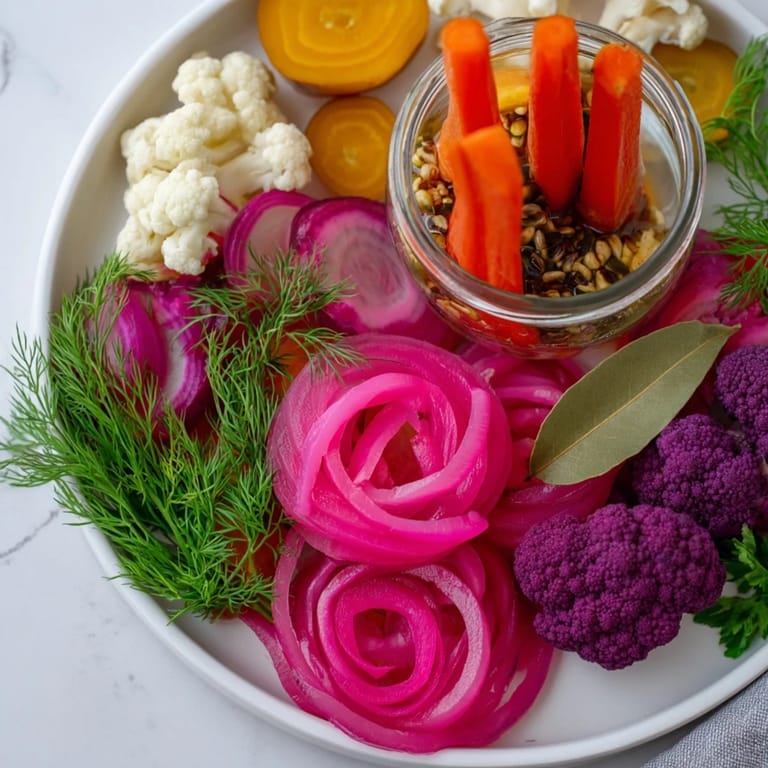
- Red onions: The quick pickling transforms them from sharp and peppery into something sweet and almost silky; slice them thin so they soften evenly and turn that gorgeous coral pink
- Distilled white vinegar: This is where quick-pickled onions get their clean, bright bite—don't substitute with anything fancy here
- Granulated sugar and kosher salt: These dissolve into the hot liquid and balance the vinegar's sharpness; the salt also starts breaking down the onion's cell walls
- Carrots: For fermentation, choose firm ones that won't get mushy; peeling reveals that bright orange surface that looks stunning in a jar
- Filtered water: Essential for fermentation because chlorine in tap water actually inhibits the beneficial bacteria you're trying to cultivate; trust this step
- Sea salt (non-iodized): Iodine interferes with fermentation, so don't skip this specification—it's doing real work for the process
- Garlic, coriander seeds, and dill: These aren't just flavor; they're aromatics that guide the fermentation toward something you'll actually want to eat, something complex and intentional
- Golden beets: Their sweetness means the pickling liquid needs honey or maple syrup to feel balanced, not one-note sour
- Apple cider vinegar: It's mellower than white vinegar, almost fruity, which lets the beets' natural earthiness shine through
- Purple cauliflower florets: Their crispness resists pickling better than you'd expect; the brief blanching helps them stay vivid without becoming mushy
- Rice vinegar: The mildest option here, with a subtle sweetness that won't overpower delicate cauliflower
- Fresh dill and parsley: These are your final flourish—scatter them just before serving, when they're still fragrant and bright green
Instructions
- Prepare your workspace like you mean it:
- Wash every jar, bowl, and utensil thoroughly with hot soapy water and let them air dry completely. This isn't about being fussy; it's about creating an environment where only the bacteria you want will thrive. Check for any cracks or chips—damaged glass will compromise everything. Set your jars in a row where you can see them; you're about to fill them with color.
- Start the red onions while your hands are warm:
- Combine vinegar, water, sugar, and salt in a small saucepan and bring it to a gentle simmer over medium heat. Stir occasionally until you feel the graininess of the sugar and salt completely disappear—this usually takes 2 to 3 minutes. While that's heating, thinly slice your red onion, getting the slices as even as possible; uneven pieces will pickle unevenly. Pour the hot pickling liquid over the sliced onions in a heatproof jar, making sure they're fully submerged. Let it cool to room temperature—this takes about 30 minutes and actually matters, because plunging hot onions into cold liquid can shock them into toughness. Onions are technically ready after an hour, but they're infinitely better after 24 hours, when they've turned a deep coral pink and softened just slightly while staying crisp.
- Set the carrots on their fermentation journey:
- Dissolve your non-iodized sea salt into filtered water—measure carefully, as this brine needs to be exactly right. Pack carrot sticks vertically into a clean, wide-mouthed jar (vertically matters; they stay organized and submerge more evenly). Tuck garlic cloves, coriander seeds, and a sprig of fresh dill around them. Pour the brine over everything, ensuring every carrot is covered. Weight them down with a fermentation weight or even a small, clean glass bowl filled with water; exposed vegetables can mold, and submerged ones ferment. Cover the jar loosely with a clean cloth or use an actual fermentation lid that lets gases escape. Leave it at room temperature between 65 and 75 degrees Fahrenheit—anywhere in that range is fine. After three days, start tasting a carrot daily; you're waiting for that moment when they smell pleasantly sour, taste tangy, and maybe show tiny bubbles when you tilt the jar. That's alive fermentation. Anywhere from three to seven days is normal; trust your palate more than the clock.
- Honor the beets with brief heat:
- Bring a small pot of water to a boil and add your beet slices. Let them blanch for exactly three minutes—this softens them just enough without turning them into mush. Drain and rinse under cold water until they're cool. While they cool, place them in a clean jar with a bay leaf. In a saucepan, combine apple cider vinegar, water, honey or maple syrup, and salt. Heat this until it just starts simmering and the salt dissolves; two minutes is usually enough. Pour this warm (not piping hot) liquid over the beets, ensuring they're fully covered. Let cool to room temperature—about 30 minutes. The beets will gradually deepen in color as they sit, becoming glossy and taking on a sweetness that plays beautifully against the vinegar.
- Quicken the cauliflower:
- This one is simple and fast. Place your purple cauliflower florets into a clean jar. In a saucepan, combine rice vinegar, water, sugar, salt, and turmeric if you want to intensify the color (it's optional but stunning). Bring it to a boil, stir until everything dissolves, then pour it directly over the florets. Press them down gently so they're submerged. Cool to room temperature—30 minutes—then cover and refrigerate. The cauliflower will stay remarkably crisp and hold its vivid purple, almost jewel-like color.
- Arrange your masterpiece:
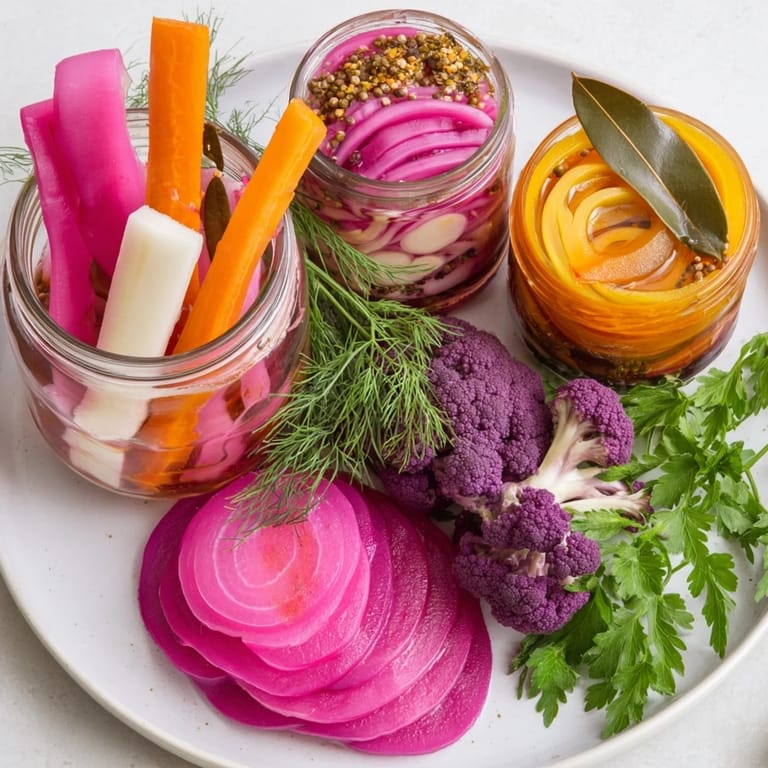
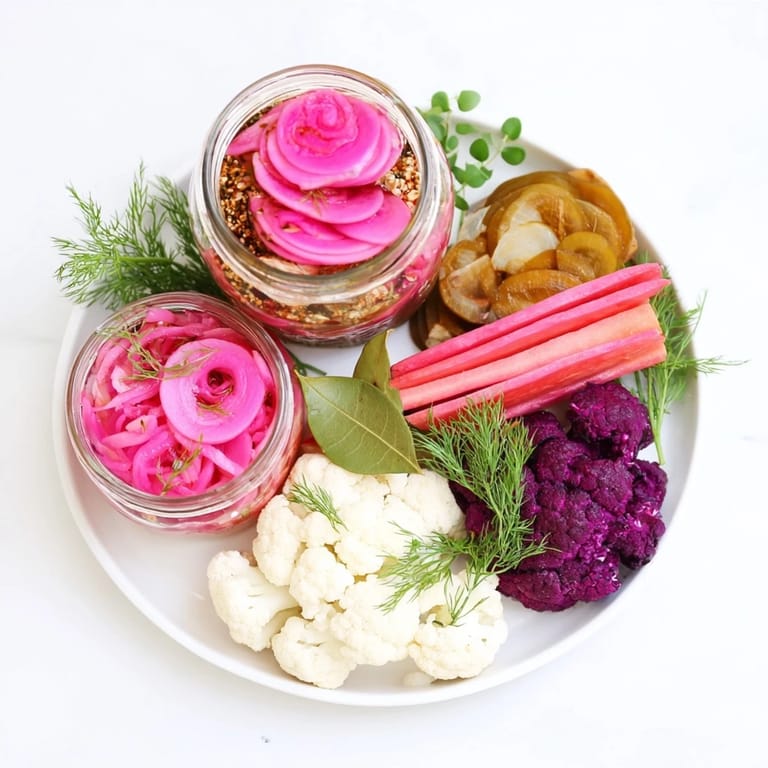
- Select your prettiest small jars or bowls—this display is half the recipe. Arrange them on a large platter or wooden board in a pattern that pleases your eye; linear, grid, or even clustered by color all work. The intentionality matters. Garnish each vessel with fresh dill fronds or parsley leaves. Step back and look at it. This is what you made. Serve immediately, or cover loosely and refrigerate until you're ready; you want to serve this within 24 hours for the crispest texture and most vivid colors.
 Pin
Pin 
I served this platter at a dinner party last autumn, and I watched a quiet moment unfold—my friend, who usually rushes through meals, slowed down completely. They'd pick a piece of fermented carrot, then a pickled beet, then some onion, and each taste seemed to layer into something deeper. It reminded me that food doesn't have to be complicated to matter; sometimes it just needs to be made with real attention and served with pride.
Understanding the Difference Between Pickled and Fermented
Pickling uses vinegar to preserve vegetables almost instantly—they're edible in hours and ready to serve by the next day. Fermentation, on the other hand, is slower. Salt brine lets beneficial bacteria (the kind that make yogurt and sauerkraut alive) multiply over days, creating a tang that develops naturally and tastes less sharp, more nuanced. The carrot sticks are fermented; the onions, beets, and cauliflower are quick-pickled. Together, they offer contrasts in both flavor and texture that make the platter more interesting than any single preparation could be.
Why Visual Presentation Matters Here
When you arrange these vegetables on a board or platter, you're not just serving food—you're creating an experience. The jewel-like colors of properly fermented and pickled vegetables are genuinely stunning, especially when they're backlit by natural light. This is partly why this preparation feels special: the effort inside the jars translates directly to beauty on the table, which makes people take their time, taste more carefully, and actually enjoy what they're eating. There's no fussy plating here, just honest organization that happens to be gorgeous.
Storage and Variations Worth Exploring
Pickled vegetables keep beautifully in the refrigerator for up to two weeks; fermented ones last closer to a month and actually stay fresher-tasting longer because fermentation is a preservative in itself. Once you understand the base formula—the ratio of vinegar to water to salt and sugar—you can apply it to almost any crisp vegetable. Radishes become almost fruity when pickled. Green beans stay snappy and develop a subtle garlic flavor. Even thin-sliced cucumbers can work, though they'll soften faster than root vegetables. For spices, try mustard seeds for earthiness, peppercorns for heat, or chili flakes if you want people to notice. The beautiful part is that once you've made one batch, you'll instinctively know how to adapt it.
- Always use clean utensils when removing vegetables from jars to prevent contamination
- If you're making this for a vegan audience, remember that honey isn't vegan; use maple syrup instead without changing the ratio
- The most important moment is the arrangement—take time with it, because that's what people will remember
 Pin
Pin This platter is one of those recipes that feels more impressive than it actually is, which is the best kind of cooking. Make it once and you'll return to it again and again.
Recipe Questions & Answers
- → How long does fermentation take for the carrot sticks?
Fermentation typically requires 3 to 7 days at room temperature, with tasting recommended after day 3 to ensure crisp tanginess.
- → Can I substitute ingredients in the pickling mixtures?
Yes, variations like radishes, cucumbers, or green beans can be used, and spices such as mustard seeds or chili flakes may add unique flavors.
- → What type of containers are best for pickling and fermenting?
Non-reactive containers such as glass or ceramic jars are ideal to maintain flavors and ensure safe fermentation.
- → How should I store the pickled and fermented vegetables?
Store refrigerated for up to two weeks for pickled items and up to one month for fermented carrots, always using clean utensils to prevent spoilage.
- → Is reheating recommended for these vegetables?
Reheating is not advised as it can soften the vegetables and reduce their vibrant colors and crisp textures.