 Pin
Pin I'll never forget the day my grandmother pulled me into her kitchen and showed me her collection of glass jars lined up like little jewels on the windowsill. Each one held something different—crimson onions, golden beets, fermented carrots—all vibrant, all alive with flavor. She'd learned pickling and fermenting from her mother, who'd learned it from hers, and watching her arrange them on a platter for family gatherings felt like inheriting magic. Now, every time I create this pickled and fermented feast, I'm transported back to that kitchen, surrounded by the heady aroma of vinegar and the promise of something delicious.
I remember hosting a small dinner party last summer where I arranged this colorful platter as the centerpiece. My guests actually paused before eating to admire it—someone even asked if I'd bought it from a fancy market. When they tasted the bright, tangy vegetables alongside crusty bread and soft cheese, the entire evening shifted into something special. That's when I realized this dish isn't just about flavor; it's about creating moments that linger long after the meal ends.
What's for Dinner Tonight? 🤔
Stop stressing. Get 10 fast recipes that actually work on busy nights.
Free. No spam. Just easy meals.
Ingredients
- Red onions (1 medium, thinly sliced): The papery outer layers conceal a mild sweetness that transforms into something bright and assertive when pickled. Always slice them thin so they absorb the vinegar quickly and turn that gorgeous pink color within hours.
- Distilled white vinegar (1 cup): Use distilled, not apple cider or wine vinegar, for the onions—it keeps the pickling liquid clear and lets their color sing. The acidity is just right for quick pickling without overpowering.
- Filtered water (2 cups for carrots, plus portions for other pickles): This matters more than you'd think. Chlorine in tap water can inhibit fermentation bacteria, so take the extra moment to filter it. Your fermented carrots will thank you with better flavor and texture.
- Sea salt, non-iodized (1 tablespoon for carrots, portions for others): Iodine interferes with fermentation, so seek out non-iodized sea salt or kosher salt. This small choice is the difference between successful fermentation and a jar of mushy vegetables.
- Sugar and honey (1 tablespoon sugar for onions and cauliflower, 2 tablespoons honey for beets): Sugar balances vinegar's sharpness, while honey adds a subtle floral note to the beets. Don't skip these—they're not about sweetness but about harmony.
- Large carrots (4, peeled and cut into sticks): Fresh, firm carrots are essential. They'll soften slightly during fermentation but should retain a pleasant snap. Cut them into sticks that fit upright in your jar—this helps them ferment evenly.
- Garlic cloves (2 peeled, for fermented carrots): Garlic mellows during fermentation, becoming almost sweet. It infuses the brine with gentle warmth without aggression.
- Coriander seeds (1 teaspoon for carrots): These add an earthy, slightly citrusy note that pairs beautifully with carrots. Toast them lightly in a dry pan first if you want their flavor to really shine.
- Fresh dill (1 sprig for carrots, fronds for garnish): Dill is the bridge between different pickled vegetables on a platter. Its herbaceous freshness makes everything taste brighter and more alive.
- Apple cider vinegar (1 cup for beets): The warmth in apple cider vinegar complements beets' earthy sweetness in ways white vinegar can't. The slightly caramel notes create depth.
- Golden beets (2 medium, peeled and sliced): Golden beets are milder and sweeter than their red cousins. They won't bleed color into your pickling liquid, keeping everything looking pristine on your platter.
- Bay leaf (1 for beets): A single bay leaf adds a whisper of Mediterranean charm without dominating. It's the kind of detail that makes people ask what you did differently.
- Rice vinegar (1 cup for purple cauliflower): Rice vinegar is gentler and slightly sweet, making it perfect for cauliflower. It lets the vegetable's natural flavor come through while the pickling liquid stays delicate.
- Purple cauliflower florets (2 cups): These are the showpiece. Their deep purple holds beautifully in the pickling liquid and creates that stunning color contrast on your platter. Choose florets of similar size for even pickling.
- Turmeric powder (optional, 1/2 teaspoon): A pinch deepens the purple to almost violet. It's purely for visual drama, but isn't that what makes a feast memorable?
- Fresh parsley (for garnish): Flat-leaf parsley adds a professional, restaurant-quality touch to your finished platter. Its clean, green hue contrasts beautifully with the jewel-toned vegetables.
- Crusty bread or gluten-free crackers (optional, for serving): A vehicle for the vegetables and their brines, turning pickles into something more substantial. Choose something with character—sourdough, multigrain, or seeded.
Instructions
- Prepare your jars and mise en place:
- Start by washing all your jars, bowls, utensils, and even your knife in hot soapy water. This is the foundation of everything that follows. Inspect each jar closely for cracks or chips—one damaged jar can ruin your entire batch. Air dry everything completely. While they dry, measure out all your ingredients. Having everything ready before you begin means you won't scramble mid-process, and your hot pickling liquid will go straight onto vegetables while it's still at the perfect temperature.
- Make the quick-pickled red onions:
- In a small saucepan, combine vinegar, water, sugar, and salt. Bring to a gentle simmer over medium heat, stirring occasionally until you see the sugar and salt dissolve completely—this takes about 2 to 3 minutes, but don't rush it. While the liquid heats, slice your red onion as thin as you can manage with a sharp knife. Pack the slices loosely into a heatproof jar or bowl, without crushing them. Pour the hot pickling liquid directly over the onions, making sure every single slice is submerged. If some float to the surface, tuck them under with a spoon. Let everything cool to room temperature—this takes about 30 minutes and you'll watch the onions transform from deep purple to a stunning bright pink. Cover and refrigerate. They're tangy-tender within an hour but develop the best flavor after a full day in the fridge.
- Start the fermented carrot sticks:
- Measure your filtered water into a bowl and dissolve the non-iodized sea salt into it completely. This is your brine, and it's alive with possibility. Take a wide-mouthed glass jar and pack your carrot sticks upright, standing them like little soldiers. As you pack, tuck in the peeled garlic cloves, coriander seeds, and a sprig of fresh dill. Pour the brine slowly over everything, making sure every carrot is submerged—this is crucial. Take a fermentation weight or improvise with a small, clean ceramic object or even a clean piece of glass, and weigh the carrots down so they stay beneath the brine's surface. Cover the jar loosely with a clean cloth or a fermentation lid that allows gases to escape. This is where patience enters the picture. Leave your jar at room temperature, ideally between 65 and 75°F. For the next few days, you'll notice tiny bubbles rising—that's the magic of fermentation happening. By day 3, taste a carrot. If it's pleasantly tart, crisp, and slightly effervescent, it's ready. If not, give it another few days. When you taste it and smile, that's your signal.
- Prepare the pickled golden beets:
- Bring a pot of water to a rolling boil. Slice your peeled beets into thin rounds and add them to the boiling water. Let them cook for exactly 3 minutes—this softens them just enough without turning them mushy. Drain and rinse under cold water immediately to stop the cooking. Place the beets and a single bay leaf in a clean jar. In a saucepan, combine apple cider vinegar, water, honey or maple syrup, and salt. Heat this mixture gently until it just begins to simmer and you see the salt dissolve. The honey needs only a moment of warmth to incorporate—don't let it boil vigorously. Pour this warm liquid over the beets, ensuring they're completely covered. Let cool to room temperature, then cover and refrigerate. The beets will deepen in color over the next day, becoming glossy and jewel-like. They taste best after 24 hours.
- Pickle the purple cauliflower:
- Place your cauliflower florets directly into a clean jar, packing them gently without crushing. In a saucepan, combine rice vinegar, water, sugar, salt, and turmeric if you're using it. Bring everything to a boil, stirring just until the sugar and salt dissolve completely. The turmeric will give the liquid a golden hue that deepens the purple florets to something almost magical. Pour this hot pickling liquid over the cauliflower immediately, pressing the florets gently to submerge them. Leave space at the top of the jar—the liquid should cover the vegetables with a bit of headroom. Cool to room temperature and refrigerate. Within hours, the cauliflower will be bright, crisp, and ready to shine on your platter.
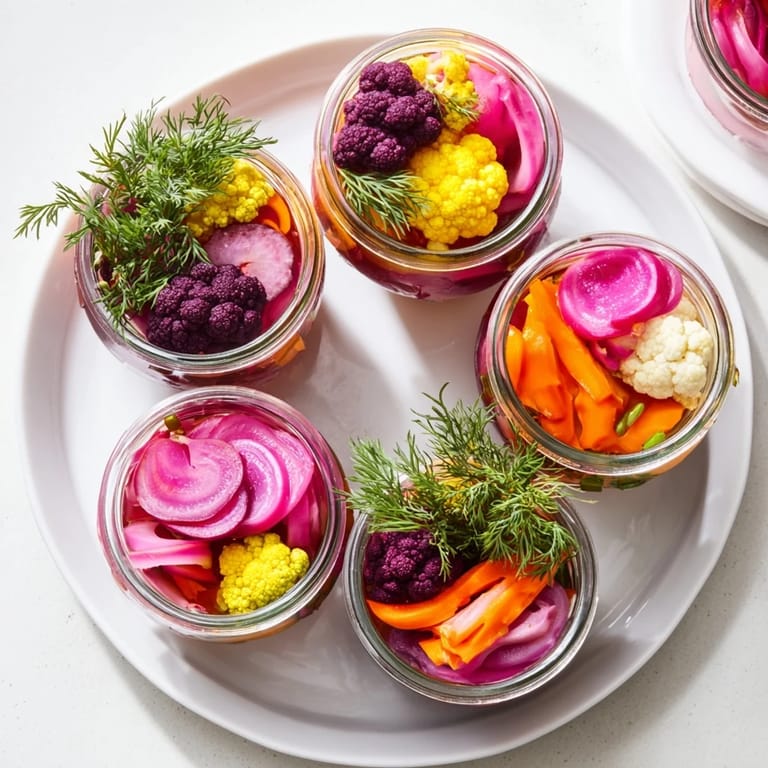
- Arrange your pickled and fermented feast:
- This is the moment where function becomes art. Select small jars or bowls for each type of vegetable. Arrange them on a large platter or wooden board in a pattern that pleases your eye—try linear rows, or organize them in a grid, or create clusters of color. Step back and look. Group similar colors together or alternate them for maximum visual interest. Garnish each jar with fresh dill fronds or parsley leaves. If you're serving this as an appetizer, arrange crusty bread or gluten-free crackers nearby, creating little pockets of color around your vegetable display. The goal isn't perfection; it's the kind of abundance and beauty that makes people want to gather around it.
 Pin
Pin 
One evening, while preparing this platter for guests, I realized my young daughter had snuck into the kitchen and was stealing fermented carrot sticks straight from the jar. When I laughed and asked what she was doing, she said they were better than candy because they tasted alive. That word—alive—stuck with me. That's exactly what these vegetables are. They're not just preserved; they're transformed into something with personality, history, and genuine vitality.
The Magic of Fermentation
Fermentation isn't as mysterious as it sounds, though it can feel that way when you first see bubbles rising in your jar. What's happening is beneficial bacteria—primarily Lactobacillus—thriving in a salt brine and creating lactic acid as they feed on the vegetables' natural sugars. This process doesn't just create tang; it transforms the vegetables' texture, making them more digestible and creating probiotics your body recognizes as nourishment. The vegetables ferment faster in warm temperatures and slower in cool ones, which is why tasting daily after day 3 matters so much. You're learning the rhythm of your own kitchen, your own temperature, your own preferences. Some people love their fermented carrots after 3 days, tangy and still quite crisp. Others prefer them after a full week, when they've developed deeper, more complex flavors. There's no single right answer—there's only what tastes right to you.
Quick Pickling Versus Fermentation
Quick pickling, which you're using for the onions, beets, and cauliflower, is a gentler, faster process. Hot vinegar essentially cooks the vegetables in acid, creating sourness through chemistry rather than biology. The vegetables are ready to eat within hours and stay crisp for weeks. Fermentation, on the other hand, is alive. It requires patience, attention, and acceptance that you can't fully control the outcome—only create the right conditions and observe what happens. Both methods are valid, both create delicious results, and understanding the difference helps you appreciate what's happening in each jar. When you bite into a quick-pickled onion, you taste sharp vinegar brightness. When you bite into a fermented carrot, you taste complexity, subtle sweetness, and the presence of something living that's already begun transforming your gut health.
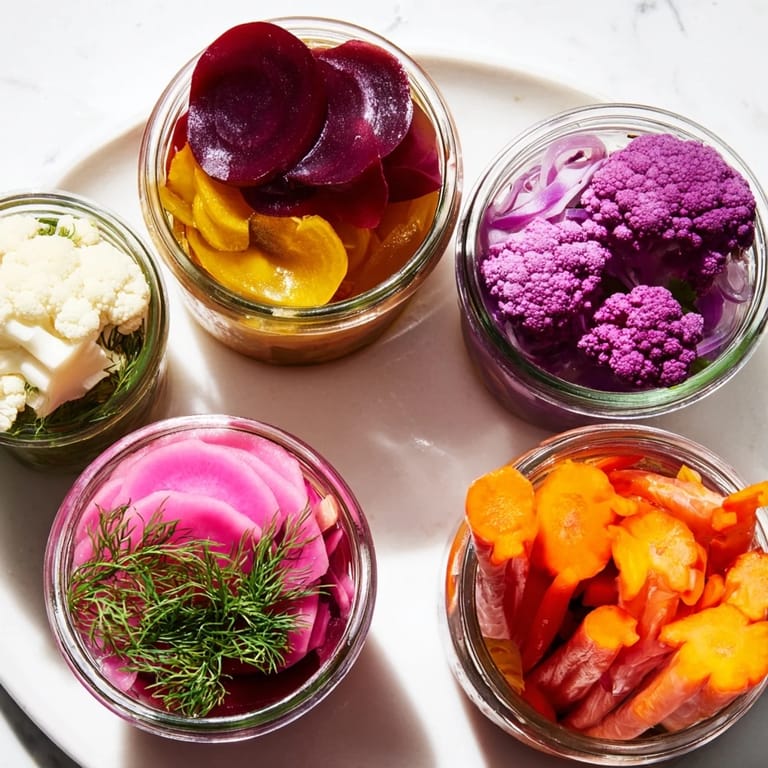
Creating Beauty on the Plate
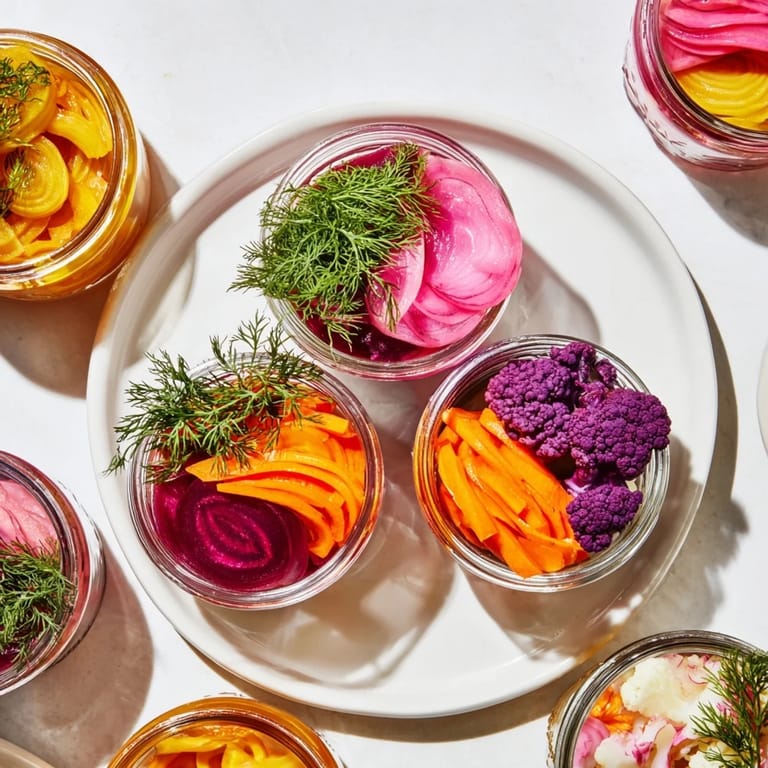
There's a reason this platter works. Every element is vibrant, every color is distinct, and the arrangement creates rhythm and balance. When you're arranging your jars, think about how your eye moves across the platter. Alternate colors so no two similar hues sit directly next to each other. The deep purple of the cauliflower looks stunning next to the golden beets. The bright pink onions pop against the pale green of the dill garnish. Use odd numbers when possible—three, five, seven—because asymmetry feels more natural and inviting than perfect symmetry. Leave a little space between jars rather than crowding everything together. Let your vegetables breathe visually, and they'll feel more precious when guests reach for them.
- A wooden platter or marble board provides the perfect backdrop for jewel-toned vegetables, letting their colors shine without competing
- Arrange jars at varying heights if possible—use small boxes or books under a cloth to create dimension that draws the eye
- Add fresh herbs between jars to break up the color blocks and add lived-in elegance to your presentation
 Pin
Pin Every time you arrange this platter, you're doing something that humans have done for thousands of years—preserving abundance from one season to sustain you through another. Now we do it for flavor and health, not just survival, which makes it feel like magic.
Recipe Questions & Answers
- → How long should the vegetables ferment or pickle?
Quick-pickled onions are ready in about 1 hour but best after 24 hours. Fermented carrots take 3–7 days at room temperature. Pickled beets and cauliflower should chill for at least 30 minutes before serving.
- → What is the best way to ensure crisp textures?
Use filtered water and keep vegetables fully submerged in brine or pickling liquid. Avoid over-blanching beets and refrigerate promptly after pickling.
- → Which herbs enhance these pickled vegetables?
Fresh dill and parsley work well as garnishes, adding bright herbal notes that complement the tangy flavors.
- → Can other vegetables be used in this assortment?
Yes, varieties like radishes, cucumbers, or green beans can be substituted to diversify flavors and textures.
- → How should leftovers be stored for freshness?
Store pickled vegetables in clean jars in the refrigerator. Pickled veggies last about 2 weeks; fermented carrots stay good up to 1 month.
- → Is reheating recommended?
Reheating is not advised since it softens the vegetables and dulls their vibrant colors.