 Pin
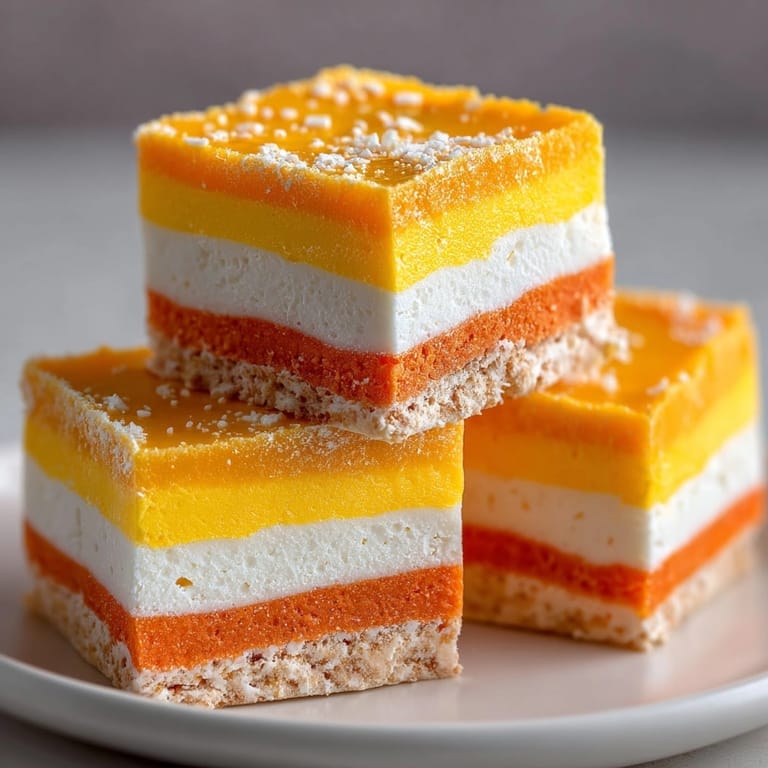
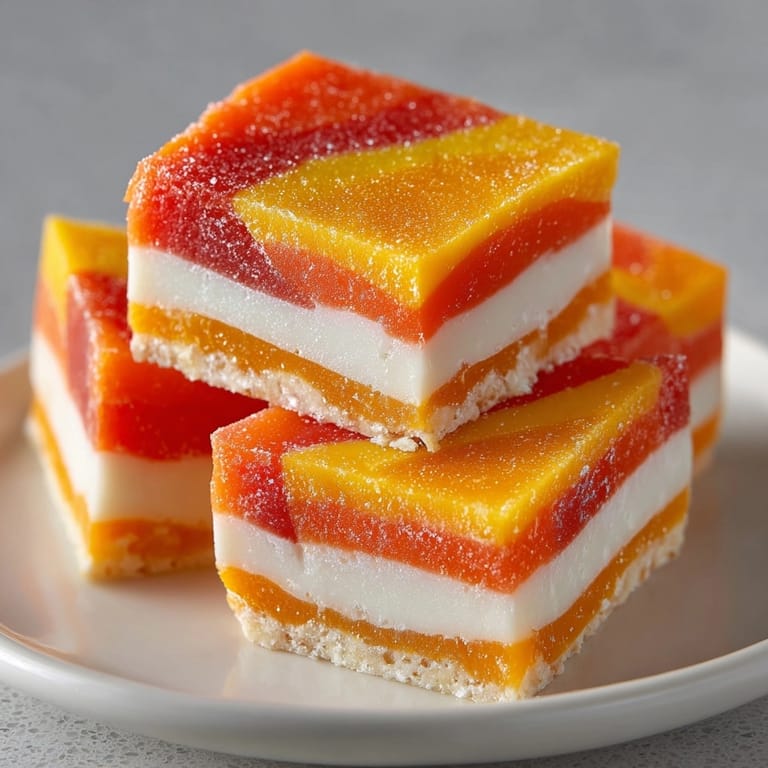
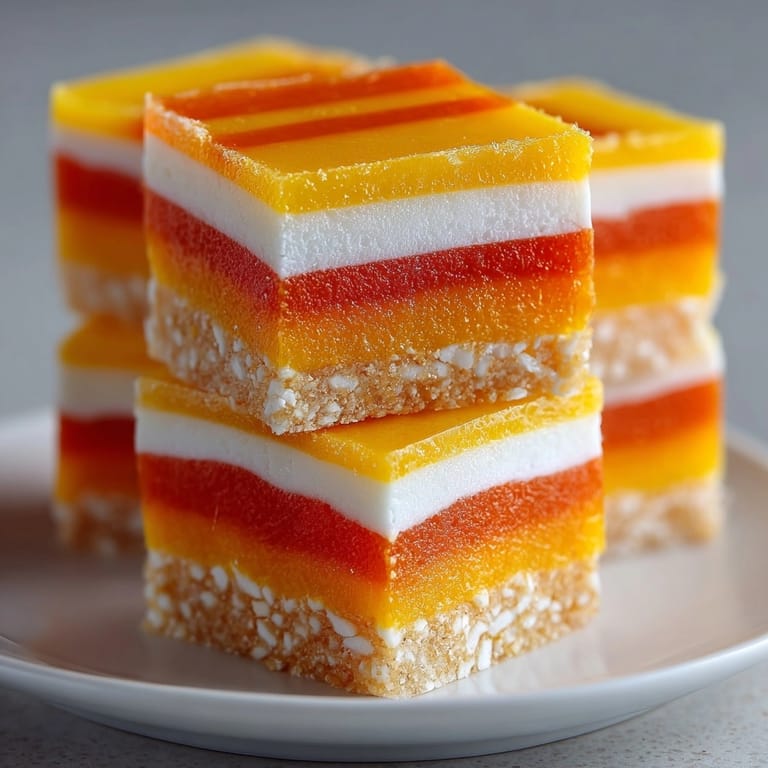
Pin Candy Corn Fudge Layered Bites have become a show-stopping favorite at our family’s October parties turning a simple autumn evening into a festive celebration. Each bite delivers a fun pop of color and a creamy sweetness that calls back to classic Halloween candy while being easy to whip up in your own kitchen.
I remember the first time I stacked the bright layers in the pan and how my son grinned as we cut them into triangles just like the real thing. Now we make extra every year to share with neighbors.
What's for Dinner Tonight? 🤔
Stop stressing. Get 10 fast recipes that actually work on busy nights.
Free. No spam. Just easy meals.
Ingredients
- White chocolate chips: for creamy sweetness and a smooth melting base
- Sweetened condensed milk: helps set the fudge and adds richness
- Vanilla extract: brings out the classic white candy corn flavor select pure vanilla for best taste
- Orange extract: offers a candy-like citrusy lift use real orange extract or swap for vanilla for a subtler flavor
- Orange and yellow gel food coloring: create vivid layers choose gels for intense color without thinning your fudge
- Lemon extract: gives a bright tang to the yellow layer try a high-quality lemon extract or fresh zest for punch
- White chocolate chips with cocoa butter: if possible look for these as the first ingredient for best melting and flavor
Instructions
- Line Your Pan:
- Line an eight inch square baking pan with parchment paper leaving extra on each side so you can lift the fudge out easily once set
- Melt and Make the White Layer:
- In a microwave safe bowl combine white chocolate chips and sweetened condensed milk then microwave in short twenty second bursts stirring after each until the mixture is smooth and fully melted this prevents scorching and helps the chips melt evenly stir in vanilla extract once smooth and pour into your lined pan spreading it from edge to edge chill for twenty to thirty minutes until firm
- Create the Orange Layer:
- Repeat the melting process with another batch of white chocolate chips and sweetened condensed milk stir in orange extract then add orange gel food coloring a drop at a time until you reach a vibrant shade pour gently over the set white layer smoothing carefully so you do not disturb the lower layer refrigerate for another twenty to thirty minutes so the middle layer firms up
- Prepare the Yellow Layer:
- Melt the final batch of white chocolate chips and sweetened condensed milk as before add lemon extract and yellow gel food coloring mixing well to get a bright color pour over the orange layer and smooth the top so the layers are defined and even
- Chill Until Set:
- Refrigerate the layered fudge for one to two hours or until fully set the chilling ensures clean layers and easy slicing
- Slice and Serve:
- Use the parchment to lift the fudge from the pan carefully slice into thirty six squares or triangles for a candy corn effect wipe your knife after each cut for the cleanest lines
 Pin
Pin 
The orange extract has become my household’s favorite ingredient its citrus scent lifts the richness and every year my kids compete over who gets the corner pieces with the thickest layer. Preparing this fudge with my sister last Halloween was one of those joyful afternoons we both still laugh about.
Storage Tips
Keep these fudge bites in an airtight container in the refrigerator so they stay fresh for up to one week. If stacking pieces place baking paper between layers so their vibrant colors do not transfer or smudge. I find they taste best after resting overnight.
Ingredient Substitutions
No orange or lemon extract on hand Use all vanilla for a mellow trio. Natural food colorings work for a softer look try turmeric or carrot for yellow and beet or carrot juice for orange. Dairy free or vegan sweetened condensed milk and white chocolate can also work but check your labels for melting quality.
Serving Suggestions
Pile them on a Halloween sweets platter alongside spiced pumpkin cookies and apple slices for a festive grazing table. For dessert boards try pairing with hot cocoa or chai tea so the creamy fudge balances the spices. Kids especially love choosing their favorite colored piece.
Cultural and Seasonal Context
Candy corn is a classic American treat that has become a symbol of autumn and Halloween festivities. These fudge bites capture that nostalgia with an easy homemade twist that appeals to both kids and adults. They make a great addition to fall gatherings and classroom parties where nut allergies are a concern.
Seasonal Adaptation Notes
Use pastel tints for a spring or Easter candy fudge. Try green and red layers with peppermint for Christmas. Switch flavors to almond or maple for winter gatherings.
Success Stories
Guests often cannot believe these are homemade when they see the sharp layers and vibrant colors. One friend begged for the recipe after her kids insisted it tasted better than store bought candy corn. A family tradition in my home is gifting a little box of fudge bites to neighbors each October.
Freezer Meal Conversion
You can freeze the fudge bites tightly sealed for up to two months. Thaw overnight in the refrigerator before serving. This makes them an ideal treat to prep well ahead of time for big parties or school gatherings.
 Pin
Pin I learned not to rush the chilling stages no matter how tempting it is to dig in early letting each layer set fully gives you those crisp Instagram worthy lines.
Recipe Questions & Answers
- → Can I use natural food coloring instead of gel coloring?
Yes, natural food colorings can be substituted for gel colors to achieve vibrant layers. Adjust amounts for desired shade.
- → How should I store these fudge bites?
Place bites in an airtight container and refrigerate for up to one week to maintain freshness and texture.
- → What’s the yield for a batch?
You’ll get 36 small squares or triangles, perfect for party platters or sharing with friends and family.
- → Can I add nuts for extra texture?
Chopped roasted nuts can be sprinkled between layers for a nutty twist, enhancing flavor and texture.
- → What allergens are present in the bites?
Bites contain milk and soy, and may have traces of nuts depending on the chocolate brand used.
- → Is this dessert suitable for vegetarians?
Yes, these layered bites are vegetarian-friendly—just check all ingredient labels for confirmation.